Showing posts with label appliances. Show all posts

Tuesday, July 22, 2014

Building the Dishwasher Platform and Cabinet

Before counter top installation day, we had to build in the new dishwasher cabinet since that was going to provide support to a larger section of a much heavier counter material. This was a Nick project, though we collaborated on the best way to go about doing it.

A few months ago we cut out the end cabinet space and set the dishwasher in place, though not secured to anything. We did use it a few times, but had to be careful while loading because it was prone to tipping forward. Not a problem now that it's entirely built in.

Here's where we left off after the cabinet removal to make space for the dishwasher:


First we created a base. The floor where the cabinet was removed from was slightly lower than the tile surrounding it, so we evened that out by screwing down a thin piece of MDF board. On top of that Nick screwed down plywood to provide some height and an attachment point for the support frame.


Dishwasher fits on the plywood base, which overlaps onto the tile. Now it sits level.
In preparation for the dishwasher installation, we had to do some electrical work. We had a friend's stepdad, who is a contractor, help with this. Nick assisted so he could learn more about it as well. That project didn't really warrant its own post, but makes sense to mention it here.

The large range outlet to the right in the photo below used to be where the silver box on the lower left is, which is where the dishwasher would go. In order to get it out of the way and keep it more accessible, we moved it over about a foot to the right. The white cord with the yellow cap that's tucked into the wall above the silver box is the newly-installed direct power supply line to the dishwasher. You can see it in the photo above after the dishwasher has been hooked up. We left the cord long so we can pull out the dishwasher pretty far if we need to. 


Because this electrical work included sawing out parts of the drywall, we had to repair it. I spackled the area, but it still needs to be painted. I'm planning to do that before the end panel is secured in place. 


Now back to the dishwasher cabinet. Nick continued building what was basically a very sturdy frame,


Nick used the original counter top and a level to make sure the upper frame was flat so there wouldn't be any gaps or slanting when they set the new counter top. We were working with precise measurements, since we wanted to have a nearly seamless transition from the counter to the range, with little to no gap between the dishwasher cabinet end and the oven. Nick did a really fantastic job on this. Now that it's installed, the side edge of the new counter top and the dishwasher cabinet line up perfectly.

We still need to stain and finish the visible areas of the frame so it matches the rest of the cabinetry. Once that is done we can actually secure the dishwasher to the upper and side frame pieces with screws using the available anchoring holes.

Just about done
After all that, we'll be securing a detachable end piece in case we need to access anything back there in the future. We're also going to include a sound-muffling layer to make the dishwasher quieter.

Finally, here's a look at the entire kitchen with the new dishwasher cabinet frame in place. Next post will be about the counter top installation and finally some pictures of what it looks like now, which is absolutely stunning!

Ready for the new counter top to be installed

Friday, March 28, 2014

New Water Heater & (Surprise) Furnace

It was only a matter of time before we needed to hire an outside company to come in on one of our planned projects. This is the first! The pipes in the house were galvanized steel and needed to be updated. There was of course absolutely no way we were going to try replacing the water pipes within our walls and crawl space by ourselves.

We received a referral for re-piping specialists by the company providing an estimate for a new water heater. Originally we were thinking about getting a tankless water heater instead of the traditional tank, but eventually decided against it. We have never run out of hot water with a regular tank, so needing endless hot water wasn't really an issue. We are going with one fueled by gas instead of electricity, which will be more efficient, and it's placement is right next to the furnace, so it's no longer taking up valuable space. Another benefit to a regular tank is extra water storage in the event of an emergency.

Here is the the original electric water heater and it's location in relation to the furnace (And ugly screen door that no longer exists:


Goodbye old water heater
And hello new water heater:


It fit perfectly between the furnace and the brick exterior of the fireplace, where there was even an existing exhaust port through which to run the additional duct work.

We thought all went well as they finished and cleaned up that Friday afternoon...until later that evening when temperatures dropped and the furnace kicked on for the first time. I heard what sounded like a door slamming in the garage. After turning on the light, then a fuse blowing, leaving me in darkness, I saw an orange glow and flames coming from the lower section of the furnace. It was on fire.

The small amount of gas that ignited burned out quickly, with Nick blowing out the remaining flame. He pulled into the driveway right when this was happening, and I had opened the garage door to air out the smoke smell that immediately filled the air.

Thinking this was probably related to the plumbing company tapping into the gas line shared by the furnace, we called them and the owner came to check it out and take some pictures on Saturday morning. Then his furnace guy came by a few days later and concluded that yes, it probably was something they did on installation of the water heater - likely not reattaching something properly. So the next day he was back with a brand new furnace for us. The original furnace was older and would have cost as much to repair as install a new one. Luckily this was all covered by the plumbing company. So instead of just a new water heater, we ended up with a new furnace as well. With all of the other necessary purchases on the house this year, we figured we'd use the old one for the winter and replace it in the fall. Now we don't have to! With this upgrade, every single appliance in our house - from furnace and water heater to toaster oven - is brand new in the past 6 months.

And I can't believe I forgot to take a picture of the old furnace post-fire, but it really wasn't that bad, Just a little charring on the metal and burned plastic coating on some wires. But here's the new pair:


And now the corner where the water heater used to be is much more open. Eventually we'll be finishing the garage and this will be a nice area of built in (upper and lower) cabinets with space for the mini-fridge, new sink and counter tops.


Friday, March 7, 2014

Cabinet 'Demolition' & Dishwasher Installation

We've been so busy with other things that progress on the kitchen has been on hold. Everything that is left to do is dependent on other things being done, and we're finally on our way to completing them now that the water pipes have been replaced. In addition to replacing the pipes, the workers also installed our new dishwasher. So in preparation for that, we had to do a little "demolition" to make room, since it wasn't just that the house didn't come with a dishwasher, it has never HAD a dishwasher.

Like we did with the refrigerator, we chose a smaller one to better fit the kitchen. That way our needs are met with minimal disruption to the flow and it doesn't feel like we tried cramming too much into the space. After not having a dishwasher for years (4+ for me, 12+ for Nick), just having one at all will feel like a luxury! We'll probably just run a load or two per week and continue hand washing pots and pans, since we use those almost daily.

After much research and reading consumer reviews, we decided on this Frigidaire 18" dishwasher in black. We decided against a stainless steel exterior in order to allow the dishwasher to blend in more with the lower cabinets rather than stand out.

 
We actually ordered this back in January and it's been in the garage since then. Once we set a date for the water pipe replacement and dishwasher installation, it was time to do "demolition," with demolition in quotation marks because there was really very little that needed to be done. Nick took on this project:

Removing the cabinet end, which was just this half-wall thing 

After end piece removal
We couldn't extend the existing base to create the wider dishwasher platform because it was too tall. We needed something at a height about half that. So we removed it to get down to the flooring:


The newly opened area under the counter top. You can see where we moved the range plug, which would have been in the way directly behind the dishwasher.


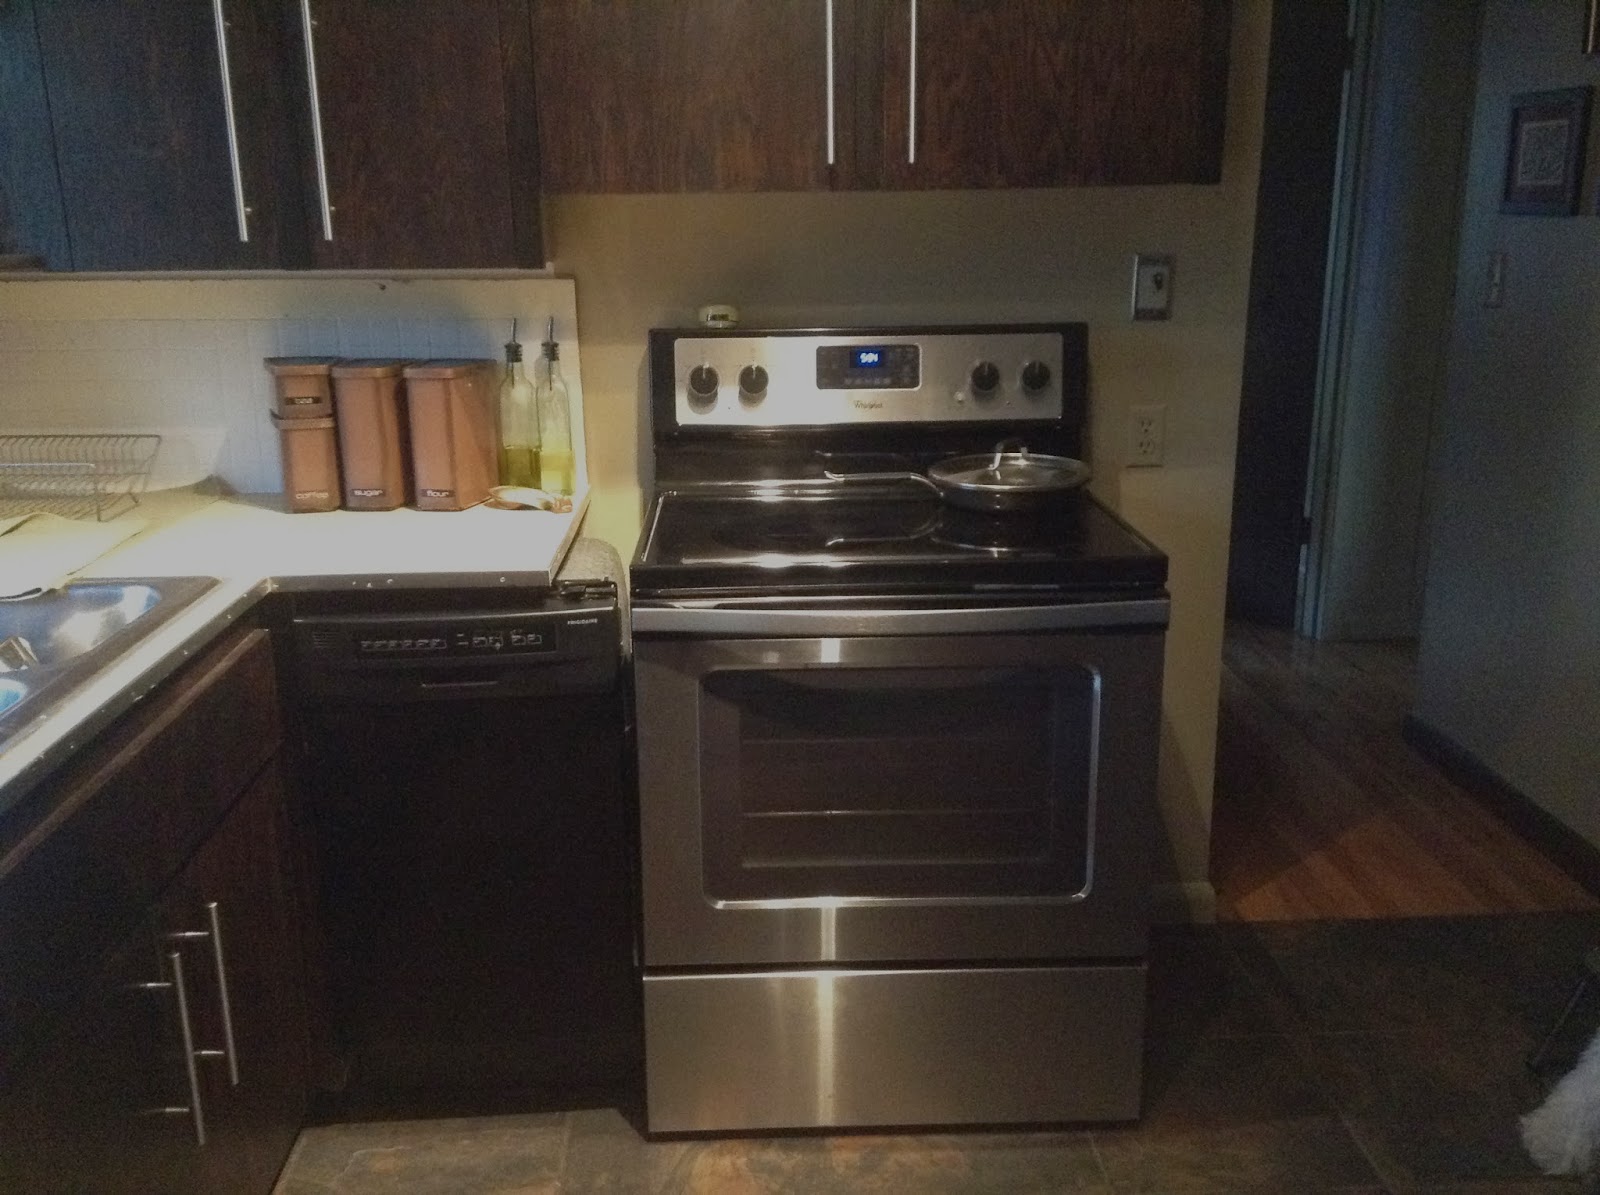
And a shot of the dishwasher temporarily in place:


We still need to build a little platform for it to sit on, to bring the top of the dishwasher up to where it needs to be in order to attach to the underside of the future new counter top. Here's an 'after' shot of dishwasher and range together, pre-platform for dishwasher:


The new counter top will extend across that gap shown above and nearly be a nearly seamless transition to the range. We are well on our way to finishing the kitchen now. We waited on the dishwasher installation until we had the new pipes. We could not get accurate measurements for a new counter top until the dishwasher was in, so now we can get that measured and ordered. Then we can start removing the old back splash, and once the new counter top is installed (another job we're not doing ourselves), we can put in the new back splash. 

Saturday, December 21, 2013

Kitchen Cabinet Refinishing, Part 3: Cabinet Doors and the Big Reveal

At the same time I was working on all of the drawer boxes and new drawer fronts featured in the previous kitchen post, I was going through the same motions (staining, drying, staining again, drying, polyurethane, more drying, etc.) with the 10 cabinet doors, many of which are very large. As I finished pairs of those I helped Nick hold them in the door openings to measure for hinge placement, then he attached the hardware.

Attaching door side hinge

Below is a stock photo of the type of hinge we used for the cabinet doors. This kind was required for the inset door look we were going for because it attaches entirely inside of the cabinet, remaining completely hidden. The previous cabinet doors were overly with hinges on the exterior.

These hinges are actually two separate pieces: the part that attaches to the door itself then clips to the part screwed into the interior wall of the cabinet base. To remove the doors you can simply unclip instead of unscrewing either. The hinges are even adjustable: after installation you can use two adjustment screws to move the cabinet doors slightly up or down and left or right, to easily center them within the door frames.


Only three of the doors were able to be installed right away because this inset hinge type needed to be flush to the cabinet door opening. For the remaining seven we had to build out the interior space in order to attach the hinges correctly, and there were a variety of differences in the space and how best to go about attaching the cabinets so the process wasn't always the same. We know about this going in, so we allotted for it in our installation time. This was one of Nick's contributions and he did a great job. Two of the seven built-in hinge bases shown below.

The wood will be painted the same green as cabinet interior. 

Once all the measurements were taken and each hinge piece installed, we clipped the doors into place to see how they looked. Below is Nick clipping one of the two largest doors into the cabinet base. We did this part after the stain was finished but before the polyurethane was applied, just to see how it all looked. Then I varnished the doors two at a time, taking them down and moving them to my workstation in the garage. After two coats on the front and one on the back I'd return them, re-attaching the door-side hinge pieces and clipping them back into place. Each pair took about a day because of drying time.


We added hardware as we went along. After I finished varnishing a pair of doors during the day and returned them to the kitchen, Nick would attach the cabinet door handles in the evening. We used Ikea Lansa stainless steel cabinet door handles. Nick did a fantastic job at this as well.

It looks crooked in the photo, but it's straight!

And now the first internet look at how the cabinets turned out and what the kitchen looks like now: 


And the 'before' photo again
Notice that the lower cabinet to the left of the range still doesn't have a door. The drawer above it hasn't been replaced either. This is the next step in the remodel: putting in a dishwasher. That's an update we're really looking forward to having. It's been about 4 years for me but much longer for Nick, as not many apartments in New York City have them. After the holidays we're going to have an electrician look at the space because we need to have the range outlet moved a foot or two to the right and a new outlet and breaker installed for the dishwasher. We've decided on a smaller 18" wide size, which should still be more than enough room for us and also save space.

After the dishwasher installation we can continue the renovation with ordering a countertop, removing the existing white tile backsplash, and after the countertop is installed, putting in a new backsplash. We were waiting to decide on a countertop color until seeing the cabinets entirely finished, to be able to get a better feel for the space and what would look best. All along I've been saying black would look best and after seeing how it turned out, Nick now agrees. As of right now the backsplash plan is stainless steel, but that could change if we find something we like better.

By the way, the photo below is nearly all of the garbage we generated during the remodel so far. Keeping all of the original cabinet bases made a huge difference. Instead of those going to the landfill, the only waste generated in order to reuse them were two small cans of paint stripper and newspapers used for collecting the paint/stripper remnants. I gave away all of the original cabinet doors and hardware by listing them on Craigslist's Free section, so those were reused by someone else. Add a few more sanding disks to the pile of wood below and that's about all of the trash created so far. Of course removing the countertop and backsplash will add to that considerably, because those can't really be re-used, but it's still not bad for such a significant kitchen makeover.


Friday, November 22, 2013

New Kitchen Appliances

The only appliance the house came with was a white Kenmore range in the kitchen, so we had quite a few appliance purchases to make. I'm not going to make a post about our washer and dryer, but that was the first thing we bought. We chose an LG set in white. Since they were going in the garage it didn't matter what the finish was, but in the kitchen we wanted all stainless.

The space for a refrigerator is limited in our galley kitchen. As you can see below, there is no 'built in' area for one; the only space where it could go is against the wall on the right. At first we considered one with french doors, since that would provide half-sized doors that when opened wouldn't make the kitchen feel too tight, but the problem with most nice refrigerators these days is that they are HUGE.

We didn't want something big. Our eating habits do not include a lot of frozen or refrigerated foods that take up space, instead buying lots of fresh stuff which gets used quickly. We've always gone to the store every other day or so rather than once a week.


We started looking at shallow counter-depth fridges and liked the idea of those better, but then discovered and and ultimately decided on this even smaller European-style refrigerator that sits on a footprint of just over 24 inches deep/27 inches wide. It's also 6 feet tall:


The brand name is Summit. It's super efficient because the freezer is on the bottom. Everything in the upper fridge is easily accessible because it's all at waist height or above, so there's no bending over like in a traditional freezer-top version. There's even a built-in 5 bottle wine rack, which will always have at least one sparkling apple cider, one white wine, and one champagne chilling.

There are more shelves and two drawers not pictured, all equally sparse

And just today we got our new range. Since we had an existing one we were fine using for a while, it wasn't a priority. But with Thanksgiving next week and us hosting Nick's family the following week, it was time for that new one. 

Here is the old:

And the new: