With warm, sunny days becoming fewer and far between, it was time to replace the doors. We knew this would be time-consuming and involve cutting, sanding, staining and varnishing -- all of which we'd rather do outside due to mess and smell.
The existing doors weren't terrible: they were heavy and solid. Definitely the originals, complete with the period hardware. Because they were all painted (likely with several coats) and stripping to the bare wood would be too much time and work, we decided to simply replace them. We also wanted flat slab-style doors and sleek handles for a more modern look throughout the house, and the unfinished state they were sold in allowed us to choose our finish and stain them ourselves.
 |
| Original door between house and garage |
 |
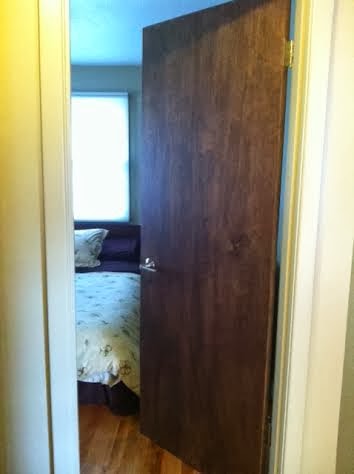
| Original master bedroom door. Guest and bathroom doors were the same. |
Nick did all the measuring and cutting, as he's about to do in the photo below. Since they were hollow slab, he figured a way to chisel out the solid wood section from within the laminate piece he cut off the bottom and used that with wood glue and c-clamps to make the 'new' bottom of the door solid.

After the glue dried overnight, I removed the c-clamps and began staining. The stain color we chose for the doors is called "Special Walnut."I started staining outside but moved inside the garage due to little pieces of nature blowing around and getting stuck in the stain as it dried.
Over several days, I put two coats of stain on all of the doors and two coats of polyurethane.

The bathroom and bedroom doors needed so little narrowing that we thought sanding them would be fine. This was my next project. It took a lot longer than planned. I ended up having to sand quite a bit off of the long edges of the door in order to narrow them enough for the frame and the hinges. It took putting them on the hinges and placing them into the frame area in between several sessions of sanding before I got them to fit perfectly. It might have been easier to cut a thin piece then sand, so we might try that when we finish the closet doors.
 |
| Sanding to fit in the door frames |
After getting a door hung came drilling the holes for the handle, which was made easy by a little jig thing for measuring the space and a special bit for the drill:

Here is the first door to be completed: the door between the house and garage. This is the only one that has the brown trim, because the brown trim is limited to the living/dining/kitchen areas. We tried to pick a wood stain that would look good with the brown paint, which was kind of tricky. Looks pretty good though, and MUCH better than before.
 |
| After |
 |
| Reminder of door 'before' |
And here is a close-up of the new door hardware we choose in order to add a modern touch throughout the house. Brushed nickel was a must, as was the lever mechanism. More popular in European countries than here the US, we think lever handles are much more stylish than traditional knobs -- not to mention more convenient. Need both hands to carry the laundry basket? Just use your elbow on the lever. The narrow cylindrical shape of the levers are also kind of similar to what we picked out for the the kitchen drawer and cabinets, keeping the hardware consistent throughout the house.

No comments:
Post a Comment