Showing posts with label dining room. Show all posts

Wednesday, December 4, 2013

The Holy Grail: Mid-Century Dining Set

Since we now had a dining room but didn't have a nice dining set, I started looking immediately after we closed on the house. Even though we wouldn't be moving in until fall, I knew it would take at least a few months to find 'the one.' For some reason the Portland area has an abundance of mid-century furniture, so we figured it was only a matter of time. I refreshed my Craigslist search a dozen times a day, because not only are these hard to find, when available they go incredibly fast. Of the few sets we saw and agreed upon, we were simply beat to it.

Four months went by and no luck, but not a big deal because we weren't living there anyway. But then we moved and had been in the house for over a month and still nothing, so I was getting discouraged. There hadn't been any good sets listed for quite some time. The dining tables and chairs in the local mid-century stores were really expensive, and we didn't really like any of the ones we saw anyway. 

We had incredibly specific requirements: medium to dark wood finish; small enough to fit comfortably in our space but includes at least one expansion leaf for when we have guests; at least six chairs, ideally padded and -- in case we didn't like the fabric -- relatively easy to re-upholster. Not to mention there were certain styles we just didn't like. 

So one Saturday afternoon near the end of October I happened to refresh my Craigslist search on a break from house projects and see a set just listed. I loved it, Nick loved it. So I emailed the seller immediately. Within the hour we pulled up in a friend's truck and were loading to take home. It literally happened that fast. Thanks to a couple downsizing, for under $600 we were the new owners of this beauty:


I'm happy we found this with some time to spare before our visit from Nick's parents and brother, which is happening tonight through this weekend. Though we will be eating out at some of Portland's best restaurants and a food cart or two, there will definitely be a few home-cooked meals and probably a game night or two around our new dining set. 

This one fit all of our criteria and more. For instance, I thought a rectangular table would fit best in the space, but Nick prefers oval. This hybrid shape was the perfect compromise: the ends are flat but the long sides are slightly rounded. Not shown above are the TWO leaves that were included, which expands the table to something like 8 feet. 

It also came with our ideal minimum number of chairs: six. The four we use most of the time are of this style:


And the final two are Captain's chairs, which we store in the garage unless needed for guests:


We also have two gorgeous Gunlock chairs in the living room that we can use to seat eight at the table. More than that and we'd just plan an outdoor dinner, since the set on the patio easily seats ten.

A detail we loved but hadn't seen before were the table legs: they start out square at the top then turn cylindrical and taper toward the floor. So cool.

Most accurate representation of the wood & color

Even the chairs have really great curves:


The seller was unsure if the fabric is original or not. It's pretty unlikely, since they are over forty years old.* I'd like to reupholster them, but that's not a priority project since the current bluish-gray fabric isn't awful. I could see having either black leather-like material for easy cleaning or an upholstery fabric in some cool modern geometric pattern or something. If it's easy enough, we could change the look entirely every few years.

*The manufacturing stamp on the underside of every piece is 1972, made by a company called Dillingham Manufacturing Co in Leland, Mississippi.

Monday, December 2, 2013

Replacing Interior Doors

With warm, sunny days becoming fewer and far between, it was time to replace the doors. We knew this would be time-consuming and involve cutting, sanding, staining and varnishing -- all of which we'd rather do outside due to mess and smell. 

The existing doors weren't terrible: they were heavy and solid. Definitely the originals, complete with the period hardware. Because they were all painted (likely with several coats) and stripping to the bare wood would be too much time and work, we decided to simply replace them. We also wanted flat slab-style doors and sleek handles for a more modern look throughout the house, and the unfinished state they were sold in allowed us to choose our finish and stain them ourselves.

Original door between house and garage

Original master bedroom door. Guest and bathroom doors were the same.
This house was built before there were 'standard' size door frames like there are in construction today, which meant having to measure and cut the doors to the correct size. This ended up being a little harder than we thought, because not only did we have to make them all shorter, they all had to be narrower as well. After messing up on the first one and needing to replace it, the next four went fairly smoothly.

Nick did all the measuring and cutting, as he's about to do in the photo below. Since they were hollow slab, he figured a way to chisel out the solid wood section from within the laminate piece he cut off the bottom and used that with wood glue and c-clamps to make the 'new' bottom of the door solid.


After the glue dried overnight, I removed the c-clamps and began staining. The stain color we chose for the doors is called "Special Walnut."I started staining outside but moved inside the garage due to little pieces of nature blowing around and getting stuck in the stain as it dried.

Over several days, I put two coats of stain on all of the doors and two coats of polyurethane.


The bathroom and bedroom doors needed so little narrowing that we thought sanding them would be fine. This was my next project. It took a lot longer than planned. I ended up having to sand quite a bit off of the long edges of the door in order to narrow them enough for the frame and the hinges. It took putting them on the hinges and placing them into the frame area in between several sessions of sanding before I got them to fit perfectly. It might have been easier to cut a thin piece then sand, so we might try that when we finish the closet doors.

Sanding to fit in the door frames

After getting a door hung came drilling the holes for the handle, which was made easy by a little jig thing for measuring the space and a special bit for the drill:


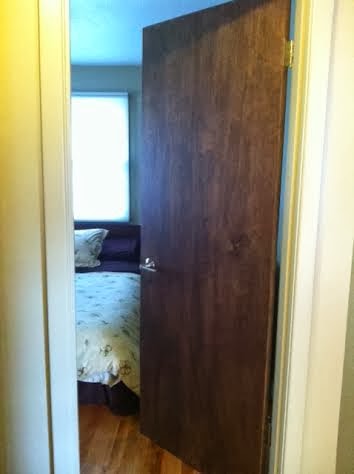
Here is the first door to be completed: the door between the house and garage. This is the only one that has the brown trim, because the brown trim is limited to the living/dining/kitchen areas. We tried to pick a wood stain that would look good with the brown paint, which was kind of tricky. Looks pretty good though, and MUCH better than before.

After
Reminder of door 'before'
And below is the finished master bedroom door. The studio/guest room and bathroom door frames all have the same "Soft Suede" trim, as do the closet doors in the bedrooms, which are the final two doors in the house that we still need to cut and finish.


And here is a close-up of the new door hardware we choose in order to add a modern touch throughout the house. Brushed nickel was a must, as was the lever mechanism. More popular in European countries than here the US, we think lever handles are much more stylish than traditional knobs -- not to mention more convenient. Need both hands to carry the laundry basket? Just use your elbow on the lever. The narrow cylindrical shape of the levers are also kind of similar to what we picked out for the the kitchen drawer and cabinets, keeping the hardware consistent throughout the house.


Friday, November 22, 2013

Dining/Kitchen Decorative Shelving Removal

The overall goal for the house is to make it feel more modern and open. One of the things we decided early on needed to happen was removal of these two rounded shelves shown below. Located on the end of what I like to call 'the peninsula,' they protruded 8 inches into the walkway between the dining room and kitchen, and we would rather have the space than the shelves. And clutter-free living means getting rid of such unnecessary areas where junk tends to collect.


In the above photo, I've already removed the metal edging from both and taken the laminate off of the bottom shelf. It's the same terrible laminate as the countertop. 

Removing these were trickier than we first thought they'd be. It turns out that the shelves were not attached independently to the peninsula, but were built-in: they were extensions of the two drawer bases on the other side. My tools for this job were a crow bar, several chisels, and a drill.

Bottom shelf gone!

First I tried just using the chisel and hammer along the peninsula, but that wasn't enough to get through the wood. I ended up having to drill holes as close as I could get to the peninsula, which means that after hammering and chiseling along the edge where I had drilled I was left with dozens of small holes I needed to fill with spackle. No problem. 

Both shelves gone!

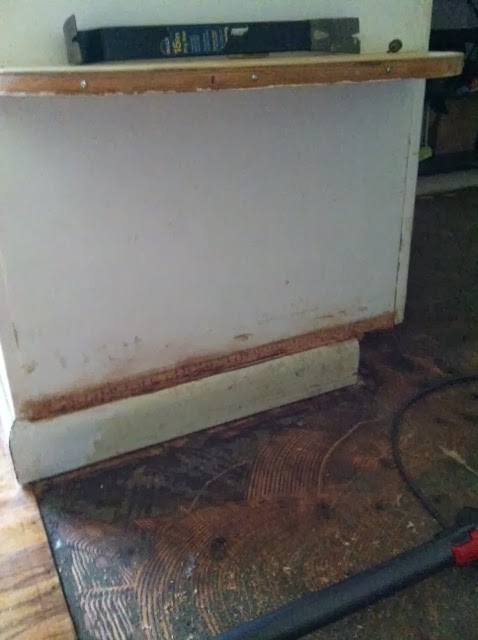
It's hard to see in the above photos, but they actually cut out the upper area of the trim to fit under the bottom shelf. When I filled the gouges with spackle, I also carefully sculpted spackle onto the trim to make it look like it was whole across the whole section. It may have looked ok uneven, but if I'm going to do all this work, I might as well do it right.

The last thing that needed to be done to get the true feel of the final dining/kitchen layout was cutting back the rounded countertop edge above where the shelves used to be. When we replace the countertop, we are only going to have the edge extend about an inch or so, whatever is standard. Below is where I drew a line and cut the counter top with a circular saw. After removing ~7 inches from the end of the counter, I was able to move the refrigerator over because the door was now free to open entirely without hitting it.

Notice the new floor!
With a single coat of paint on and the shadow of the counter top gone, I could more easily see where I still needed to fill and sand again, so I did that:


And then painted another few coats to finish both the upper section and the trim:


So much better than the original! Nick still needs to write his kitchen floor post, but you can see above what that looks like. And you can see a sneak peak at what the cabinets are looking like now compared to below...


Wednesday, August 14, 2013

Nick Refinishes the Floor

After the day of prep work we were ready to put down the first coat of polyurethane. I vacuumed one more time and then Nick started the application. He had done this only once before, but had a complete handle on it. 
I'm not going to include pictures of all three coats, though there were noticeable differences between each of them and I did document them. He did the first Friday afternoon, which took the longest. We allowed the first coat to drive overnight then Nick completed the second by early afternoon on Saturday. We went back that night to do the final coat, finishing that sometime around midnight. This was the first trip we stayed at the house, but these two nights we had to stay at a friend's place. Sunday morning we left there, stopped by our house to see how the final coat turned out, then got on the road back to Utah.

First room: Master Bedroom. Working his way toward the door where I'm standing.
Closet done
Close up: first coat compared to sanded area
Dining area after
Dining area before for comparison
Living room finished
And before shot of the living room floor again. Incredible difference.


Floor Prep

Even with four days of painting we didn't get everything completed. The studio/guest room still needs to be painted but refinishing the floor took priority for the rest of the week. 
The floors were really dull and very worn. There were some water spots in the living room and black marks that resembled tire treads on some of the bedroom floors, which was probably transfer of some kind from carpet pads back when they were carpeted. 

Dining area before
Living room before
Nick spent Friday morning sanding the wood floor throughout the house while I used the vacuum to clear out all of the dust so he could see the areas he'd already done and where he still needed to sand. I ended up vacuuming 4 or 5 more times after he was finished in order to make sure we got all of the dust and anything else that might have been on the floor.

Nick sanding the studio/guest room
He had to spend extra time on areas like the one below, but was able to reduce these marks significantly!

Tire tread-like marks in bedrooms from carpet pad 

It took several hours of sanding, but the floors were finally ready. We had an appointment to have the fireplace inspected that afternoon, so as soon as that was over Nick started with the polyurethane. Here are photos of the living room and dining area sanded and ready to be refinished:

Living room sanded

Dining room sanded 


Tuesday, July 30, 2013

More Painting...

After spending one weekend of the past three months in Portland working on the house, we planned a week-long vacation for end of July to have some fun and finish everything we wanted done before the move, which will likely be in September. Since we took a full week off, we decided to drive and take a second car-full of stuff we won't need for these final few months in Salt Lake City.

I started where I left off: dining room. Below was the island "as is," which was just white and dirty. I removed the door, handle, and hinges and painted the area with several coats of the same "Soft Suede" as the rest of the dining room/living room.

Before

After paint, but before brown trim

Door reattached and a first coat of brown trim down, with bonus shirtless Nick
I'll probably have to do some touch up painting underneath the counter top once that has been ripped up and replaced, which we'll do soon after we are living there full time. We haven't decided yet on a counter material, but color will be basic black.

It's hard to tell but I did not paint the end of the island where those weird rounded shelves are because those are going to be removed. Once gone and any damage patched and sanded, the plan is to paint the end the same color as the rest of the island. Removing those shelves and stopping the new counter top where the island ends will open the area and give us more space for moving between the dining room and kitchen.